Using the Dimension STM Cartridge
Scanning tunneling microscopy (STM) imaging requires a specially designed STM cartridge, which plugs into the Dimension Icon scanner and has a small tube for inserting an STM tip:
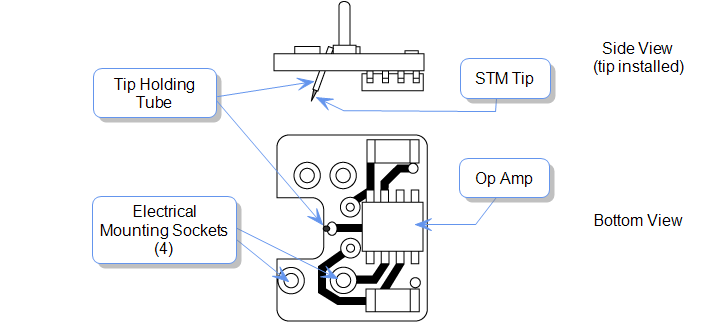
The holder contains a stainless steel tube with a 0.012" inner diameter mounted in ceramic at the center of the piezo tube. This design preserves the symmetry of the scan, although some may find it difficult to see the tip-sample interface. A circuit mounted on the probe holder contains the preamplifier for the tunneling current and provides connections to the tube electrodes.
The tip is tilted relative to the sample instead of pointing straight down. The tilt is designed to allow the user to see the tip in the optical view.
The STM cartridge is installed in the probe head in the same way as the AFM cartridge, with the tip pointing down. The instructions below explain how to insert STM tips into the STM cartridge.
WARNING: STM tips are very sharp. Be careful when handling an STM cartridge with a tip loaded. Avoid leaving the STM cartridge on a table or other work surface with the exposed tip pointing up. Store the STM cartridge and tip in a container with a lid.
To Insert a Tip Into the STM Cartridge:
- Use a tip that has been made using wire cutters or an etched tip.
- Grip the STM tip with tweezers near its sharp end.
- Feed the back end of the tip through the hole in the underside of the cartridge. The underside of the cartridge is the side with the protruding preamp chip.
- Keep feeding the tip through the hole until approximately 2 mm of the sharp end protrudes beyond the end of the head. Keep the wire as straight as possible when feeding it through the hole. Often, the back end of a tungsten tip splinters and becomes difficult to fit through the hole. If this happens, trim the end with wire cutters to remove the splinter.
- To hold the tip in place, put a small bend in it before it is completely inserted.
- Check that the tip length projects beyond the preamp chip; otherwise, the chip will come into contact with the sample surface before the tip engages.
- If necessary, cut the back end of the tip with wire cutters after the tip is inserted. If the wire protrudes too far out the back of the tip holder it will touch the scanner cap electrical ground and cause current leaking.
To store an STM cartridge with a tip loaded, place the cartridge in a container with a lid with the sharp tip pointing up. Be sure to close the lid of the container.
To remove a tip from an STM cartridge, grip either end of the tip with needle-nose pliers, and pull the wire out of the hole.
| www.bruker.com
|
Bruker Corporation |
| www.brukerafmprobes.com
|
112 Robin Hill Rd. |
| nanoscaleworld.bruker-axs.com/nanoscaleworld/
|
Santa Barbara, CA 93117 |
| |
|
| |
Customer Support: (800) 873-9750 |
| |
Copyright 2010, 2011. All Rights Reserved. |
Open topic with navigation